

This is #90DaysofDevopschallenge under the guidance of Shubham Londhesir.
Introduction:
Welcome to Day 34 of our journey with Kubernetes! Yesterday, we got really good at using Deployments, and now it's time to learn about Services. Services are like the communication centers for your app, making sure you can connect to your Pods easily, no matter what their IP addresses are. They are like bridges that let different parts of your app talk to each other easily. Let's see how Services make talking within Kubernetes simpler.
Understanding Services in Kubernetes
Services in Kubernetes are like the traffic controllers of your app. They give you a steady way to reach your app's Pods, even if their IP addresses keep changing. Think of Services as the links that let different parts of your app chat without any hiccups.
Task 1: Making Todo-App Accessible via NodePort Service
First, let's ensure our todo-app is accessible.
Creating a NodePort Service YAML: Draft a YAML file named
nodeport-service.ymlfor a NodePort Service to expose your todo-app Deployment. This Service type enables app access on a node's specific port.apiVersion: v1 kind: Service metadata: namespace: <namespace-name> name: todo-app-nodeport spec: type: NodePort selector: app: todo-app ports: - protocol: TCP port: 80 targetPort: 8080 nodePort: 30007Deploying the Service: Execute
kubectl apply -f nodeport-service.yml -n <namespace-name>to launch your Service in the Kubernetes (minikube) cluster.kubectl apply -f nodeport-service.yml -n <namespace-name>Service Verification: Confirm service functionality by accessing the todo-app through the Node's IP and the specified NodePort within your Namespace.
curl http://<node-ip>:30007Replace
<node-ip>with the IP address of one of your cluster nodes.
Task 2: Enabling Internal Communication with ClusterIP Service
Now, let's move on to Task-2, where we'll create a ClusterIP Service for accessing the todo-app from within the cluster.
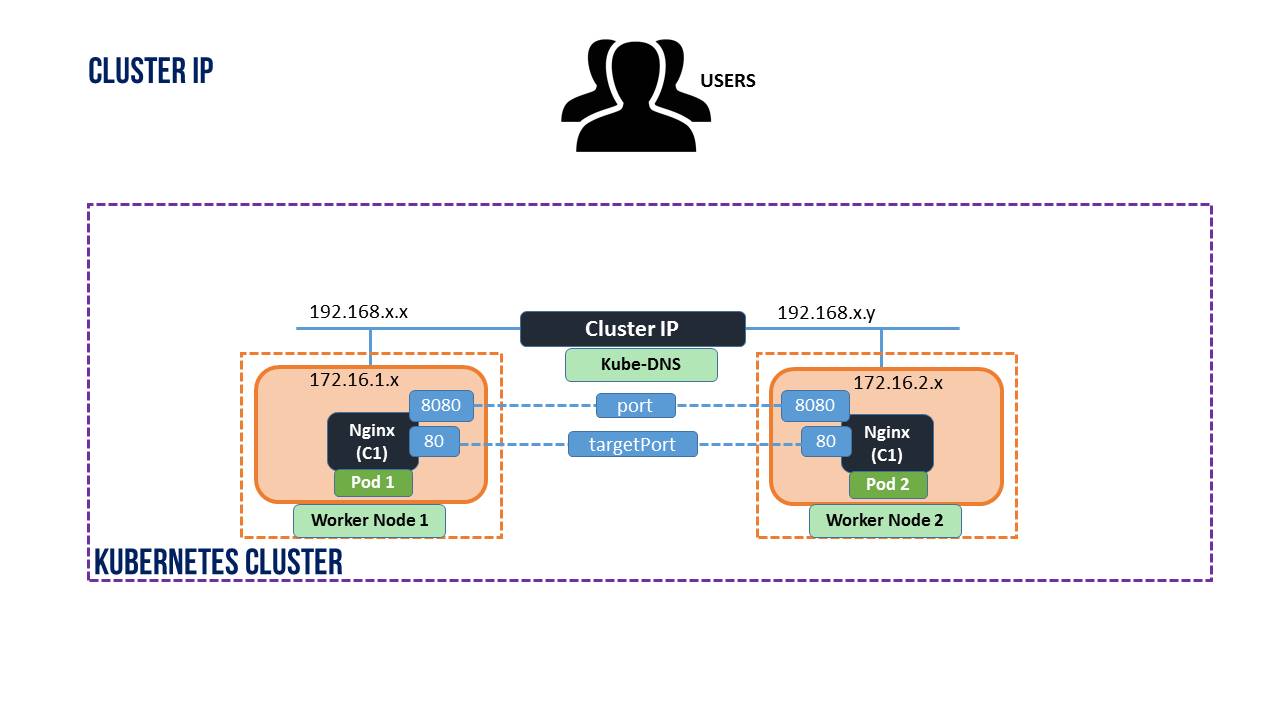
Create a ClusterIP Service definition: Craft another YAML file that defines a ClusterIP Service for your todo-app Deployment. This type of Service enables communication between Pods within the cluster.
 apiVersion: v1
 kind: Service
 metadata:
   namespace: <namespace-name>
   name: todo-app-clusterip
 spec:
   type: ClusterIP
   selector:
     app: todo-app
   ports:
     - protocol: TCP
       port: 80
       targetPort: 8080
Replace
<namespace-name>with the name of your Namespace.Apply the ClusterIP Service definition: Apply the YAML file to your Kubernetes cluster using the
kubectl apply -f cluster-ip-service.yml -n <namespace-name>command.kubectl apply -f cluster-ip-service.yml -n <namespace-name>Verify the ClusterIP Service: After applying the ClusterIP Service definition, ensure that the Service is functioning correctly by accessing the todo-app from another Pod within the cluster in your Namespace.
Task-3: Creating a LoadBalancer Service
Lastly, let's tackle Task-3, where we'll set up a LoadBalancer Service for accessing the todo-app from outside the cluster.
Create a LoadBalancer Service definition: Craft a YAML file that defines a LoadBalancer Service for your todo-app Deployment. This type of Service allows external access to your application.
 apiVersion: v1
 kind: Service
 metadata:
   namespace: <namespace-name>
   name: todo-app-loadbalancer
 spec:
   type: LoadBalancer
   selector:
     app: todo-app
   ports:
     - protocol: TCP
       port: 80
       targetPort: 8080
Replace
<namespace-name>with the name of your Namespace.Apply the LoadBalancer Service definition: Apply the YAML file to your Kubernetes cluster using the
kubectl apply -f load-balancer-service.yml -n <namespace-name>command.kubectl apply -f load-balancer-service.yml -n <namespace-name>Verify the LoadBalancer Service: After applying the LoadBalancer Service definition, ensure that the Service is functioning correctly by accessing the todo-app from outside the cluster in your Namespace.
Conclusion
By working on these tasks, you've really improved your skills in using Kubernetes Services. These services are key for making sure different parts of your app can talk to each other easily, whether they're inside or outside your computer cluster. You've learned important basics and gained hands-on experience that will help you manage and grow apps better. Keep learning and exploring the world of Kubernetes. Enjoy your journey!