

This is #90DaysofDevops challenge under the guidance of Shubham Londhe sir.
Introduction:
Welcome back to Day 32 of our Kubernetes journey! Today, we're diving into Deployments, a vital aspect of managing applications within your Kubernetes cluster. Deployments simplify the process of updating and scaling applications, offering features like auto-healing and auto-scaling to ensure reliability and efficiency. Let's explore how to leverage Deployments effectively with a practical example.
Understanding Deployments in Simple Terms:
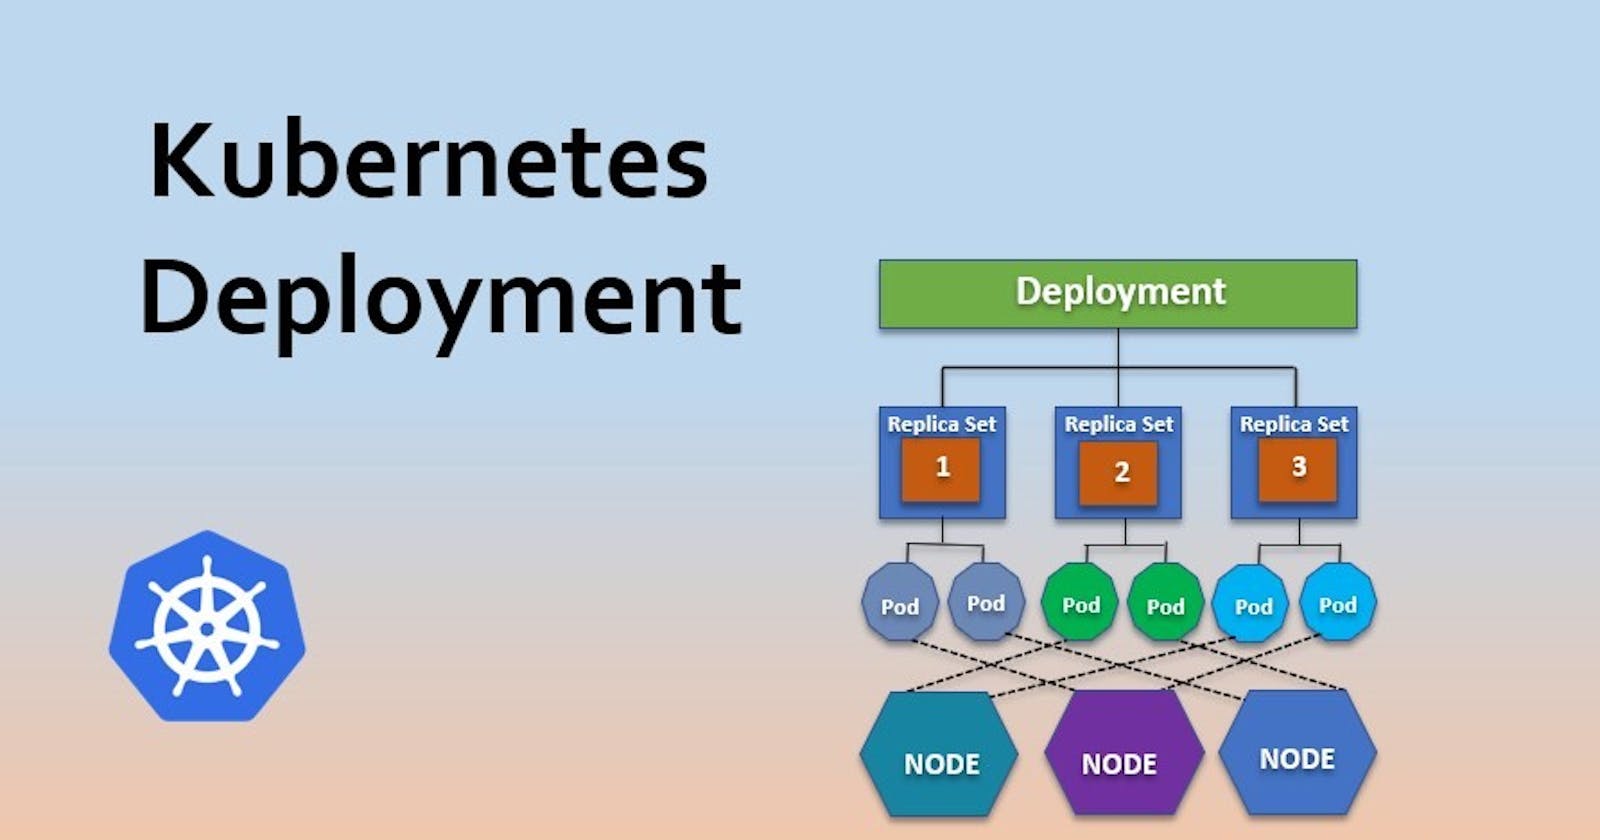
In Kubernetes, a Deployment serves as a blueprint for managing the lifecycle of your application. It allows you to describe the desired state of your app and ensures that Kubernetes maintains this state over time. Think of it as your personal assistant, ensuring that your app stays healthy and performs as expected.
Why do we need Deployments? 🤔
Deployments are essential for several reasons:
Structured Updates: Ensure smooth updates to your apps with structured deployment strategies.
Rolling Updates: Perform updates with zero downtime using rolling updates.
Automated Rollbacks: Easily roll back to a previous stable version in case of issues.
Scalability: Scale your application horizontally with ease, based on demand.
Resource Management: Optimize resource utilization within the cluster for cost-efficiency.
Fault Tolerance: Enhance application resilience with automated fault detection and recovery.
Simplified Management: Manage application lifecycles more efficiently with a higher-level interface.
Today's Task: Deploying a Sample Todo-App with Auto-Healing and Auto-Scaling:
Our mission for today is to deploy a sample todo-app onto our Kubernetes cluster, equipped with auto-healing and auto-scaling capabilities. This means our app will be able to fix itself if something goes wrong and can grow or shrink based on demand.
How to Get It Done:
Step 1: Creating the Deployment File
Firstly, let's create a Deployment file named deployment.yml. This file will define the configuration for our todo-app deployment. Here's a snippet of what it looks like:
apiVersion: apps/v1
kind: Deployment
metadata:
  name: todo-app
  labels:
    app: todo
spec:
  replicas: 3
  selector:
    matchLabels:
      app: todo
  template:
    metadata:
      labels:
        app: todo
    spec:
      containers:
      - name: todo-app
        image: supriya279/node-todo-app:latest
        ports:
        - containerPort: 80
        resources:
          limits:
            cpu: 500m
          requests:
            cpu: 200m


---
apiVersion: v1
kind: Service
metadata:
  name: todo-app
  labels:
    run: todo
spec:
  ports:
  - port: 80
  selector:
    run: todo

In this file, we define the desired state of our todo-app, including the number of replicas, image details, and ports.
Step 2: Applying the Deployment
Once our deployment.yml file is ready, we can apply it to our Kubernetes cluster using the command:
kubectl apply -f deployment.yml

This command tells Kubernetes to deploy our todo-app with the specified configuration.

Step 3: Setting Up the Autoscaler:
Run the following command to create a HorizontalPodAutoscaler (HPA) for your todo-app. This HPA will ensure that you have between 1 and 10 replicas of your todo-app, depending on CPU usage.
kubectl autoscale deployment todo-app --cpu-percent=50 --min=1 --max=10

This command tells Kubernetes to monitor CPU usage and adjust the number of replicas to maintain an average CPU utilization of 50% across all Pods.
Step 4: Checking the Autoscaler Status:
You can check the status of the newly-created HorizontalPodAutoscaler by running:
kubectl get hpa
This command displays information about the HPA, including its name, target CPU utilization, minimum and maximum number of pods, and the current number of replicas.
The output will look something like this:


Explaining Auto-Healing and Auto-Scaling:
Auto-healing and auto-scaling are two crucial features provided by Deployments in Kubernetes, and they play a significant role in ensuring the reliability and efficiency of our applications.
Auto-Healing:
Imagine your app suddenly crashes or becomes unresponsive. Not a pleasant scenario, right?
Well, with auto-healing, Kubernetes acts like a vigilant guardian, constantly monitoring the health of our application. If it detects any issues, like a crashed pod or unresponsive service, Kubernetes jumps into action. It automatically tries to fix the problem by restarting the troubled part of our app or replacing it with a new, healthy version. This ensures that our app remains available and operational, even in the face of unexpected hiccups.
Auto-Scaling:
Now, let's talk about auto-scaling.
Picture this: your app starts getting bombarded with requests from users, causing a surge in demand. Without auto-scaling, your app might struggle to keep up, leading to slow response times or even crashes. But with auto-scaling, Kubernetes is like a wise manager, dynamically adjusting the number of app instances (replicas) based on the workload. When demand spikes, Kubernetes automatically spins up additional replicas to handle the increased load. And when things quiet down, it scales back to save resources. This ensures that our app always has the right amount of resources to deliver optimal performance, without wasting precious computing power or money.
Conclusion:
By deploying our todo-app with auto-healing and auto-scaling features, we've made our Kubernetes cluster more resilient and efficient. Deployments play a crucial role in managing application lifecycles, offering features that enhance reliability and scalability in dynamic environments.